>>CLICK<<
Cheers :)


 For some reason I’ve never managed to make transfer graphics for decorating items, even though I have a proper printer and paint thinner. I got really frustrated, ‘cause all of my attempts were failures and I found so many interesting images on the Internet I wanted to use. So I came up with an idea. I’ve tried to print out a graphic on a tissue paper and.. bull’s eye! It came out really nice. So today I want to show you how you can get some new decoupage tissues with any picture you want.

 Recently, my sister and I got into Studio Ghibli’s movies. If only we discovered them sooner! We watch one movie every Friday evening. So far we’ve seen: My Neighbor Totoro, Spirited Away, Howl’s Moving Castle, Ponyo, Secret World of Arrietty, Whisper of the Heart and Kiki’s Delivery Service and we’re glad there’s still so many to go. Thus, I came up with the idea to give my sister a T-shirt with Ghibli’s logo for Christmas. After little research I decided to make one instead of buying. My sister was so happy when she opened her present! So today I want to show how to make one yourself.

 After making the cook notebooks I had some of the oilcloth left. So I decided to make a new tutorial using them. I’ve always wondered what’s the purpose of those plastic circles in CD packages. I have plenty of them so I was thinking how I can recycle them. At first, I wanted to make a small rack but my attempts were all failures. However, this oilcloth is pretty inspiring – I came up with an idea for cup pads. So, gather all of your old, broken CDs and get to work!

 I wonder how many of us failed in your last year’s resolutions? Well, I did for sure. It turns out that it does not take much to make them more likely to achieve next year. Most of us probably compose the goals the wrong way and that’s why we forget about them by the end of January. In today’s tutorial I want to show you how to make our goals more achievable using paper, scissors and a little bit of modern psychology, the basics of which I had a chance to learn during my university courses. Scientific texts quoted here come from the book "Improving interpersonal skills" written by Hanna Dolna, who is the coach at interpersonal training at my uni, during which, I learned how to properly formulate goals, and not just business ones.
 For a long time I wanted to create some kind of bells but I couldn’t find anything with the right shape to recycle. I was trying to use deodorant caps or toilet paper tubes but the effect wasn’t satisfactory. My salvation came when I saw those perfectly shaped bottles at the mall. I think my mother is still wondering what I had in mind when I popped out of the kitchen and shouted “Don’t you throw away those bottles! I can see bells in them!” with madness in my eyes… Tee hee.. Anyway, I am very proud of the effect and I’m going to hang them on my window. I think it can also be a good addition to Christmas wreaths.

 I suppose I won’t surprise you with this new tutorial. It’s December after all – there are hundreds of Christmas tutorials on the Internet and that number is still growing ;). Since salt dough is an easy-to-get material, I decided to show you how you can make gingerbread decorations. But beware! This tutorial is highly dangerous for family foodies, ‘cause they can break their teeth by mistake. For their own good, best if you warn them about making this kind of gingerbreads ;).

 I can say – making this Christmas tree really made my day. I wanted to create something that I haven’t seen on crafting blogs, so I searched a lot of them to make sure I won’t copy someone else’s idea. So far I haven’t found anything similar. I bought this polystyrene cone, but I wasn’t sure how I’m going to use it. The idea came quite quickly, when I saw those paper doilies. I grabbed the scissors and this is what I ended with.
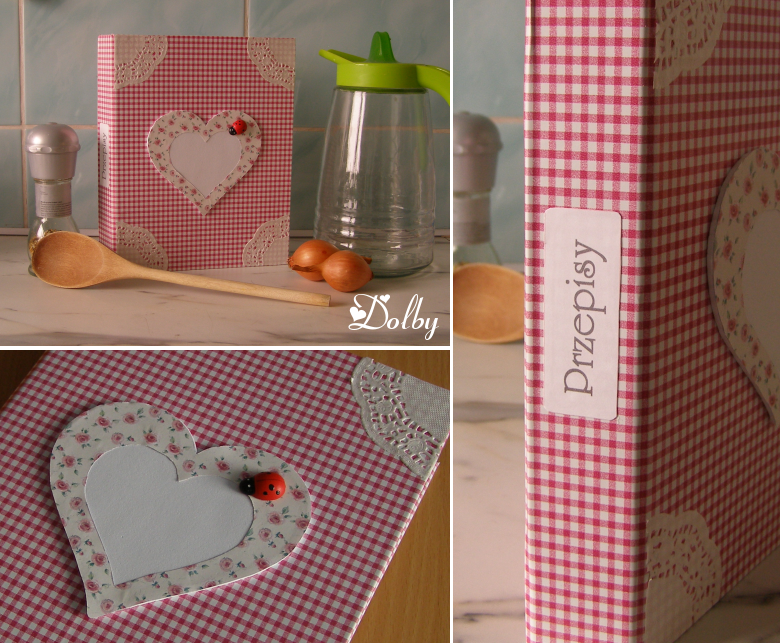 I have seen many ideas for recipe notebooks but none of them met my needs. They often were made of regular school notebooks which discredits their practicality in a kitchen environment… It’s common knowledge – kitchens get messy during work and the paper cover would get covered with greasy stains in no time. Besides, I really don’t like having a limited number of pages ‘cause any additional recipes would have to be kept loose. Therefore, I want to show you a new generation of recipe notebooks – with a 100% washable cover, with adjustable number of pages and with recipes easily sorted by type. Basically, with every feature I look for in such notebooks. I’m going to donate four of those notebooks to a charity fair in my town.
 Today's tutorial was inspired by a student from my uni, who has got a quite unusual pen - something like this. Upon closer inspection, it turned out it isn't what I expected - it just pretends to be a syringe, but in fact there is a normal ballpen inside it. But, it has inspired me to further experiments, which were succesful and ended with my new blog entry. I especially recommend this tutorial for medical students :)
 Halloween is not very popular here in Poland but every year more and more people start celebrating this joyful day, mostly teenagers. Every year there are more and more Halloween stuff you can get at shopping centres, so maybe someday it’ll be an integral part of All Saints’ Day. That’s why I decided to make a Halloween tutorial for you. I’m sorry for the quality of the photos but I had to come back to my job and I don’t have a lot of free time. That’s why there are differences in light – some of them were taken in the morning and some in the evening. But nevertheless - Happy Halloween!

 Autumn is far from being the most cheerful time of the year. Each of us has fresh memories of the summer and we don’t have a warm welcome for the cooler months. Of course, they also have some charm of their own, but autumn is mostly associated with passing away, reflection and quiet contemplation. Rainy evenings are a perfect opportunity to catch up on books you haven’t read. As for adding some optimistic aspect to your meeting with reading, I’ve decided to show you how to make happy bookmarks. I hope their happy faces will chase away the autumn blues. It is also a nice tutorial for kids, because they usually get bored on rainy days.
 How many times did you find yourself in a situation when it was impossible to find any merch of your favourite band because it’s not very popular? How many of you wanted a patch with your favourite game or anime but you’re short on money at conventions? It happens to me very often. In today’s tutorial I want to show you how to make a patch with your favourite logo using just a piece of denim and paint. It is also a perfect tutorial for punk rock fans, since handmade patches would be a great addition to their outfit.
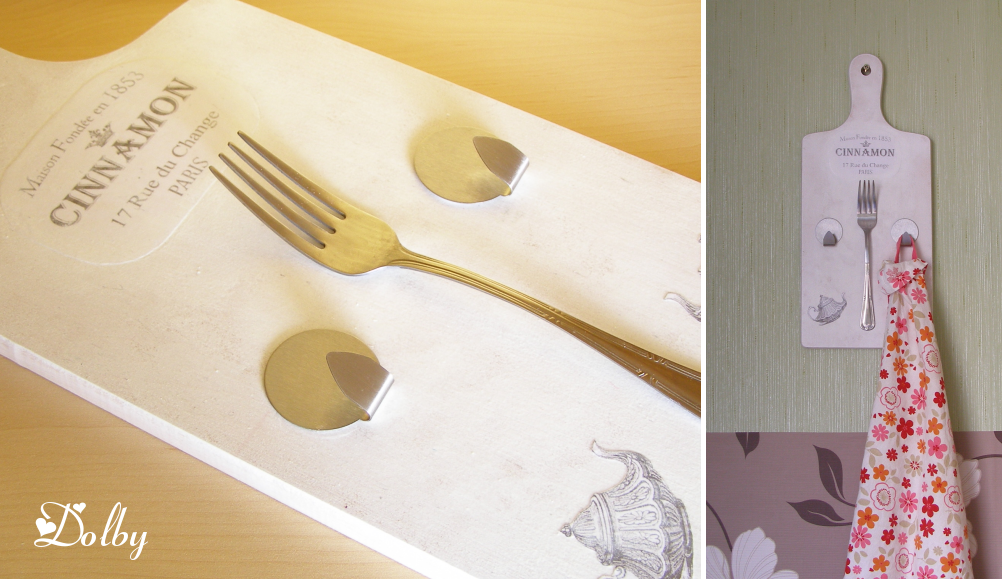
 This photo has inspired me to make cute cutting board hooks as a wedding gift for my bestest friends. Unfortunately, after a lot of effort, I failed - it was impossible to bend my forks without a vice. So I changed the idea a little bit and the final effect you can see above. And for the wedding - it was so... lovely. My friend was the loveliest bride! The food was delicious, the band did a great job with the music, the bride's wedding dress was amazing. They both looked so happy and I was happy for them too. I hope it all was just like they imagined.

 Once again I failed with adding new notes. And I promised! Unacceptable! But really... recent events are making me unable to find any time to add new ones. So there's a litany of the reasons of delays for those of you and I hope you'll forgive me: I am writing the first chapter of my master's thesis, I was on vacation, I was looking for job, I got the job I like, I got a ticket and I was felt down, I'm preparing for my friend's hen party and wedding, I had birthday, I was looking after my dying pet... So it was pretty much 50:50 for nice and bad events. And in today's tutorial - new ideas for chenille stems.

 Sorry for the long break but I have so much to do now. In today’s tutorial (and a few next ones), I decided to use the chenille stems I got for my birthday. It’s a tutorial mainly for kids but I’m sure adults can find some fun in it as well. I’m going to catch up with my overdue tutorials, so probably there will be next one next week, also with fluffy flowers.
 I have got my first e-mail with a tutorial request in June. I was very happy to know that someone likes my blog and find it interesting. The request concerned a drawing pad, which the author of the e-mail had found on the Internet. I have send her a preliminary version of the tutorial but I didn't have time for posting it here. This week I finally found time for completing this project. The final version vary from what I send as an answer, but the result should be the same. It is also a good opportunity to learn the patchwork technique.

 Recently, I have noticed a new trend among the teenagers interested in Japanese culture – cat's ears. They're supposed to be „kawaii” and adorable, but those I found are, for me, too fluffy and too extravagant so I decided to make simpler ones myself. They can be used as a hair decoration for teenagers, as an element of a costume for kids or an interesting addition to your sexy outfit. Once again the basic knowledge in crochet will be needed here (for the new readers – you can find very comprehensible tutorials for basic stitches in „A vernal hair accessory”).
 My younger sister and I had got lots of various magazines with CD-ROMs when we were kids. But they took up a lot of space so I decided to put them in the CD sleeves. The empty jewel cases have been lying on the shelf for a long time, 'cause I thought they would be useful someday. And "someday" is today! I was thinking of transforming them into photo frames and realization came last week. Check it out - it's fast and easy!
 For a very long time I have been thinking about shortening my pants due to a shortage of my summer clothes. I wanted to make a tutorial about it too, but it's not very impressive to write something like "cut off the pantlegs and congrats - you did it it in 3 seconds"... So I came up with a little enrichment - painting the pockets. I really like country music (and I mean the real thing, 'cause "this modern pop country ain't country at all"), so I decided to paint the Dixie flag on my shorts as a tribute to Daisy Duke. But it's my choice - the same way you can paint other flags.

