
+of+finish3.png)
"Sign up at your local Vault Shelter today!"
(Fallout; 1997)
 I'm sure that everyone of you have at least one object that you hate with all your heart. It can be an unwanted present or something that reminds you someone you don't want to remember. If a clock is one of them, today's tutorial is going to show you how you can change it. I found one sometime ago. I won that in some crappy raffle...It almost has been thrown away, but then I came up with a little make over for it. If you like the Fallout series, I'm sure you'll like this Vault Clock too.
difficulty: hard
estimated time: 4 days
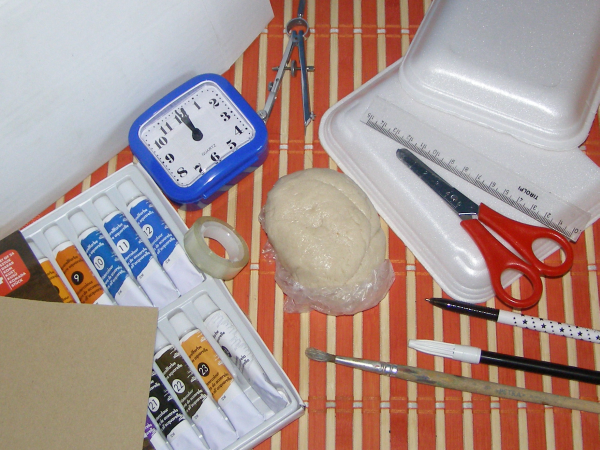
What you be needing:
- an old but working clock
- salt dough (>>recipe<<)
- a cardboard box
- polystyrene trays
- a piece of stiff paper
- paints
- paintbrush
- a compass
- white glue
- tape
- scissors, ruler and pencil/marker
Tutorial steps:

1. Dismantle the clock to get only its mechanism. Detach the hands and remove the clock’s face. You can throw away the clock’s casing, but leave the face – it will be used when marking the points on the new one.
2. On the piece of stiff paper draw a circle of a radius of 4 cm (well, the radius is not necessarily important here, just make it a little bigger than the clock’s mechanism). Cut a small hole in the centre – that’s where the hands will be attached.
3. On the leftovers of the stiff paper draw a mirror image of your favourite vault number (you can even make 108 if you want O_O). We’re using a mirror image so that when you glue it, you will have the drawing lines facing downwards.
4. Paint the circle and the numbers with dark-grey colors.

5. Now draw (or print from the link in Downloadables section) a gear - it should have 12 teeth, which should be 0.5-0.8 cm long and equally spaced like the numbers on the clock’s face (use the old one to mark those points). Cut it out and paint the teeth with dark paint.
6. Glue the circle, gear and numbers together and put it under a heavy book to prevent the vault door from curving.
7. From the cardboard box cut out the walls in the following size:
- 20 x 5 cm (one piece) – for the top,
- 11 x 5 cm (two pieces) – for the side walls,
- 20 x 11 cm (one piece) – the front wall, in which cut out a shape equal to the shape of the mechanism (around 5 cm from the edge), but remember to pay attention to where the 12 on the clock was (!),
- 10 x 20 cm (one piece) – for the floor.
Then, tape them together like in the picture. It doesn’t have to be perfect, because it will be hidden beneath the salt dough.
8. Cover the cardboard frame with the salt dough, leaving the clear space for the door and metal arm. To frame the door precisely along its edges, trace the shape of your door on an unused piece of stiff paper, cut it, put it on your cardboard frame and put the salt dough around it. Then move the template in various directions to expand the space for the door. Take the template off and make small corrections.

9. Heat the oven to 50°C [120-130°F] and harden the new clock’s casing for two days (you can do it in phases).
10. During hardening you can also make details for your clock – like the console and metal arm. Use the polystyrene trays to make them. Simply cut out the needed shapes and stick them together above the fire. You can make the details with an old empty ball pen – the material is very prone to grooving.
11. After hardening the casing, paint it with grayish colors.
12. Stick the door and accessories to the casing, and then attach the clock’s mechanism from the inside and mount the hands. Set the time and congratulations - you can count the time to the nuclear war yourself!
Downloadables:
- Printable version (pdf)
- Cog template

Next week: Striped Bottle Vase
No comments:
Post a Comment