1. Modeling materials
SALT DOUGH
Salt dough is a very popular modeling material. It's fast to prepare and you can create interesting things with it. However, it requires a long drying process in an oven. You can speed this up by making aluminum foil frame and placing the dough on it, instead of making the whole product out of salt dough.
Ingredients:
- wheat flour (rye flour is not recommended)
- table salt (grinded to consistency of icing sugar)
- water at room temperature
- optional:

·
wallpaper
adhesive (1 spoon for 250 g of flour) – it will make the dough more elastic
·
dishwashing
liquid – will make the dough softer
·
juice
from fresh lemon – will make the product harder and more durable
·
paint
– if you add it to the dough, you don’t need to paint it manually after drying
Instructions:
Mix the ingredients (flour, salt and water ratio should be 1:1:0,75) and knead the dough for 5-6 minutes, squeezing it from time
to time with your fingers. If you think the dough is too dry, add some water,
if it’s too wet – add some flour. The final result depends on duration of
kneading, so if you think that the ingredients are not mixed enough, knead it
longer. The dough should be prepared two hours before modeling.
Use your saliva to put together elements
made of salt dough.
Products made of salt dough should
be dried in a fan oven, at 70°C for 10-12 hours or even two days, if they’re
big. You can do it in phases, instead of continuous drying.
MAIZE DOUGH
This recipe comes from the Italian
book Modellare pasta al sale e altri
materiali and it’s an alternative to the salt dough. It doesn’t require
drying in the oven, because it dries well at room temperature.
- a cup of maize flour
- a cup of white glue (vinyl adhesive)
- a table spoon of lemon juice
- two table spoons of vaseline
- a spoonful of ersatz coffee
Instructions: Melt
two spoons of vaseline in an old unused pot. Add the cup of flour, the spoon of
ersatz coffee and a cup of glue and mix them. After that, add a table spoon of
lemon juice. Mix the ingredients
carefully and then warm them up over low heat. Stir the mixture till it’s thickened
to the consistency of dough (2-3 minutes). Put it on a pastry board and knead
it while it’s still warm. Make sure it’s smooth and doesn’t stick to your hands.
You can also add some paint to the pieces of the dough, so that you don’t have
to paint it manually after drying.
PAPIER-MÂCHÉ
It’s a perfect possibility to recycle wastepaper. Products made of papier-mâché shrink while drying, so I recommend
it for making simple shapes.
- old newspaper (or toilet paper)
- wallpaper adhesive
- gypsum plaster powder
- pot of water
- small plastic bag and tenderizer (or a wooden spoon) or a blender
Instructions:
Tear the newspaper or toilet paper into small pieces and put them in a pot of
water. Boil it for 5 minutes and leave it for the night. Next day, pour out the
water and blend the soaked paper in the blender. You can also use the plastic
bag instead of blender – put the paper in the bag and beat it with the tenderizer
(or a wooden spoon) to make a pulp. Add 3 or 4 spoons of plaster powder and 2
spoons of wallpaper adhesive to the pulp – it will prevent our product from
shrinking. Knead the mass till it gets the consistency of clay. If you don’t
want to use the pulp at once, put it into the plastic bag and keep it in a
fridge to prevent it from drying.
SAWDUST DOUGH
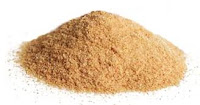
This recipe is for readers who don’t
have any problem with getting waste from sawmills. The bedding sawdust for
animals won’t do, because it’s too big. What we need here is the powdery
sawdust, as you can see in the picture. The
recipe comes from the Polish book Zróbmy
to sami by K. Łubkowska and I. Zgrychowa.
- powdery sawdust
- wheat flour
- water
Mix one cup of sawdust with two cups of flour. Pour some water and knead it to make dough like the one for dumplings. Items made with sawdust dough are very durable. Dry them at room temperature. You can paint them after drying.


No comments:
Post a Comment