"The South will boogie again."
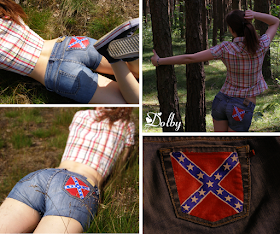
(The Simpsons Movie; 2007)  For a very long time I have been thinking about shortening my pants due to a shortage of my summer clothes. I wanted to make a tutorial about it too, but it's not very impressive to write something like "cut off the pantlegs and congrats - you did it it in 3 seconds"... So I came up with a little enrichment - painting the pockets. I really like country music (and I mean the real thing, 'cause "this modern pop country ain't country at all"), so I decided to paint the Dixie flag on my shorts as a tribute to Daisy Duke. But it's my choice - the same way you can paint other flags.
difficulty: medium
estimated time: 2 days
You need:
- old jeans
- tailor scissors
- fabric paints in the colors of the flag
- 13 white plastic stars
- a piece of stiff paper
- tape
- tailor meter
- a cutter knife
- paintbrush
- old newspaper
- Super Glue
Tutorial steps:
1. Taking your other shorts as a basis, measure and mark the corresponding length of the legs (from the outer and inner side of the thighs) on your old jeans.
2. Join those points with the tape – in the front and in the back. I could have used paper tape, it would be more visible in the photo… (well, it’s too late). Then cut off the pantlegs along the tape.
3. Tape the pocket along the seam to secure it from any stains. Believe me or not – there IS tape in the photo. Then paint the whole pocket with white paint, if you want the colors to be more intense.
4. Find the square battle flag in Google Graphics or wherever and copy it three times in MS Word (if you’re making a different flag, copy it as many times as many colors there are on the flag). Then print it out on the piece of stiff paper – using black ink – it doesn’t need to be in color.
5. On each flag, cut off the shapes (by color) to make a template for each color.
6. Tape the first template to the pocket and paint it inside. Press down on the paper to prevent the paint from getting under the template. Leave it to dry.
7. Tape the second template, paint it and leave it to dry. Use the template with stars for marking their position on the flag. Any stains you can remove by painting with a toothpick.

8. Twenty-four hours after painting the last color, preserve the flag by ironing on the reverse side in accordance with the instruction on a tag. Then attach the stars with super glue. I leave the fate of the other pocket to you.
Downloadables:
- Printable Version (pdf)
And there's a background music for you if you wanna use this tutorial:
Next week: Photo Frame


No comments:
Post a Comment